: Astrolog supports dial wheel charts with midpoint trees, as used in Uranian astrology. To display it, bring up Astrolog’s midpoint chart with graphics mode on (with the -m -X switches, or with the “Chart / Midpoint List” menu command). The dial used is based on the harmonic chart factor setting, in which a harmonic factor of 1 is a 360 degree dial, 2 is a 180 degree dial, 3 is a 120 degree dial, 4 is a 90 degree dial, and so on. Dials may also be specified in number of degrees covered, in which the parameter to the -x switch (or the “harmonic chart factor” field in the Calculation Settings dialog) may have the prefix “d” to indicate a dial degree instead of a harmonic chart factor. For example, entering “4” or “d90” will both do a 90 degree dial.
The dial chart will have a red arrow crossing the wheel pointing to the focus planet or degree, and it can be interactively moved by pressing the left and right arrow keys, or by clicking and dragging the right mouse button. The parameter to the -XZ switch (or the “telescope focuses on this object” field in the Graphics Settings dialog) will indicate the object for the dial to focus upon. If that field is empty and not set to a planet, then the dial will instead point to the degree indicated by the parameter to the -XW switch (or the “horizontal map degree rotation” field in Graphics Settings).
The dial will also draw lines between planets which have the focus point as their midpoint. These lines will use the orb of the Conjunction aspect to determine how wide to allow lines. The middle of the chart will list these midpoints, showing the two objects forming the midpoint, the angle in dial degrees between them, and the orb or how offset the midpoint is from exact. This midpoint list can be sorted in several different ways, based on the -a subswitch (or the “sort aspect list by” field in the Chart Settings dialog). Specifically, you can sort by aspect i.e. angle (the default), by orb, or by object index. Note that the “3D aspects” setting will apply to these midpoints, and if enabled will calculate 3D midpoints based on great circles that take ecliptic latitude into account, instead of just midpoints based on zodiac position only. If the “show equator” setting is on (-Xe switch) then instead of a dial and midpoint tree, standard aspects between points around the wheel will be drawn.
-Z -X: The -Z local horizon feature can be displayed in an X window as well (e.g. astrolog -Z -X), in which all the planets will be displayed in a window depicting the sky. The small dot above or below each glyph indicates exactly where each planet is. (Some of the glyphs may be overlapping, although the program tries to avoid this.) There is a horizontal line dividing the window representing the local horizon; planets above this line are visible, while planets below it are set. There are three vertical lines dividing the window as well: The middle line represents the due south direction, the one to the left is due east, the one to the right is due west, and the edges of the window are due north. (These directions are labeled in the borders of the chart.) Like the standard chart display, this window or graphic may be resized to any proportion. At any time one can press the 'Z' key when a graphic is up to enter this display type in that window.
-Z0 -X: An additional graphics chart is available through the -Z0 switch: local horizon charts suitable for stargazing. The normal -Z switch generates a listing of the planets with respect to the local horizon, and the -Z combined with the -X switch generates a graphic image of the planets and stars on the local horizon. That chart assumes one is facing due south, and is divided left to right by the horizon line, with straight up being toward the top of the screen and straight down toward the bottom. That is a good chart, especially for noticing the rising and setting of planets and other objects, but the fact that the meridian is split up causes distortion when trying to view objects high up in the sky. Therefore, if one combines this -Z0 switch with the -X switch, a differently oriented local horizon chart will be displayed. Here, the zenith point straight up is in the center of the screen, and the horizon line is a surrounding circle. Due north is along the line from the center to the top of the screen, due south is on the line from the center to the bottom, east is to the left, and west is to the right. In other words, this is just like what one would see if they were lying on their back looking straight up with their feet to the south, so this should be better for stargazing. Outside the circle marks what’s below the horizon, and the extreme corners of the screen mark the nadir or what’s straight down. All points below the horizon are compressed to fit between the horizon circle and the outer boundary square, allowing all points in the sky to be visible. As with the normal -Z graphic chart, this one has the various axes marked at five degree increments.
The placement of directions in this circular local horizon chart can be changed with the -YZ switch setting. If the -YZ switch setting is odd, the chart will be flipped horizontally across the East West axis (and the E/W labels will be flipped too of course). If the -YZ setting is 4 or greater, the chart will be flipped vertically across the North South axis.
-S -X: The -S switch can be combined with -X to give a graphics chart of the solar system. This will be displayed as an aerial view of the entire solar system, with 0 degrees Aries to the left of the screen, 0 degrees Cancer to the bottom, etc. Whatever object is chosen to be the central body is at the center of the screen, with all the others around it. This is a fun chart to animate, in that one can watch the planets orbit around the Sun, and see how they turn retrograde with respect to the Earth. In addition to the bodies themselves, twelve spokes are drawn from the center body to the edge of the chart, which delineate the zodiac with respect to it. This chart will also label the zodiac signs, with sign glyphs around the outside edge of the chart. These glyphs and the lines to mark the sign boundaries can be toggled with the show house details setting (-XC switch). This chart can also display aspect lines between the planets. The aspects present will be with respect to the central body, and will be the same aspects as seen in the aspect grid or in the middle of a wheel chart. The display of these aspects can be toggled with the show equator setting (-Xe switch).
Note that the scale of the solar system is large, which means attempting to fit all the planets out to Pluto on the screen at once will cause all the inner planets to be crammed together near the middle of the screen. To deal with this, the scale size as indicated with the -Xs switch and the '<' and '>' keys will affect how much of the solar system is viewed at once (in addition to controlling the glyph sizes). For a scale size of 100, the viewing region will have a wide radius of 90 AU, enough to easily include the entire solar system, as well as the orbits of the hypothetical Uranian bodies beyond Pluto. For the default scale size of 200, it will have a radius of 30 AU, enough to include Neptune (and Pluto most of the time). For a scale size of 300, the viewport will have a radius of 6 AU (about out to the orbit of Jupiter, which is useful for viewing the inner planets). Finally for a scale size of 400, the viewing region will have a radius of 1 AU (just enough to cover the Earth’s orbit). At a 400% scale zoom with the Moon included as well, one can actually get a feel for the relative distance of the Sun from the Earth and the Moon from the Earth, although the chart will have to be over 1000 pixels wide for the Moon to even appear one pixel away from the Earth! If the scale size is 400, and the -XS graphic text scale is set to 200 or larger, then the viewing region will be a very small 0.006 AU, which is just large enough to fit the Moon’s orbit, so works well with geocentric or Moon object centered charts, to see the motion of the Moon, Nodes, and Lilith around the Earth. Note that if the -b ephemeris files setting is off, then Earth’s Moon will be left out.
This chart can display star objects, as well as the list of additional stars. If stars objects are unrestricted, or the list of additional stars is being shown, then their positions will be plotted in this chart. Because stars are so far away, the chart scaling will be in light years instead of Astronomical Units (AU), which is a factor of about 63000. That will make all planets appear to be overlapping in the middle of the chart, and as a result when showing stars it’s recommended to restrict all non-star objects except the Sun. Astrolog’s 3D wireframe file of this chart will plot stars in 3D space, resulting in a 3D environment in which one can explore the local area of the galaxy. For example, the Astrolog animation http://www.astrolog.org/astrolog/screen/dipper.gif flies through space around the Big Dipper, allowing one to see how it appears from different angles.
-l -X: The Gauquelin sector chart may be displayed in graphical form by combining the -l switch with -X, where the 36 sectors will be arranged in a wheel, with chart header info displayed at the bottom or in a sidebar as with regular wheels. Each planet will be plotted at its appropriate sector location, with plus zone sectors labeled in red and minus in dark green, and aspects will be indicated in the middle of the wheel. This chart also has the plus or minus zone status of each sector indicated by a small plus or minus sign around the outside border of the wheel. The sidebar in this graphic Gauquelin sector wheel chart will to the right of each planet position show the sector number the planet falls in. (Normally this is just the glyph for the object in question like it is for the other wheels.)
-j -X: Graphic dispositor charts are available by combining the -j influence switch with -X. This is a another graphics chart format that can also be switched to whenever screen graphics are up by pressing the 'J' key. The dispositor of a planet is the planet that rules the sign it’s located in. For example, if you have Venus in Aries, the dispositor for your Venus is Mars. A graph can be made showing an arrow from each planet to its dispositor. A final dispositor is a planet who is its own dispositor, i.e. in its ruling sign with no arrows pointing away from it. There can also be two planets in what’s called mutual reception (or a reception loop of more than two) if they are each other’s dispositor, e.g. Venus in Aries and Mars in Libra. Astrolog’s dispositor chart will show four subgraphs, one in each quadrant. Both a sign dispositor graph, as described above, and a house dispositor graph, where each planet is linked to the planet ruling the house it’s in, are shown. In addition, both types have the same information displayed in two different useful formats: a wheel with the planets around the perimeter, and in a hierarchy with final dispositors at the top and the other planets stacked based on how many levels they are from final ones. Final dispositors are circled in white, while those in reception loops are circled in gray, and dispositor arrows within the top level (i.e. in reception loops) are in white too instead of the color of the planet for easy identification. For a demo of the dispositors in your own chart, do “astrolog -i yourchartfile -j -X”.
This chart normally graphs standard rulership dispositors, and will include all non-star and non-cusp objects within it. However, if standard rulerships are restricted (-YR7 switch) and esoteric rulerships aren’t, then it will instead graph esoteric rulerships. If esoteric rulerships are graphed, then the chart will always include Earth and Vulcan (which means Vulcan should be unrestricted so its position isn’t 0Aries) for 12 planets instead of 10 in the chart. If both standard and esoteric rulerships are restricted and Hierarchical rulerships aren’t, then this will instead graph Hierarchical rulerships.
If the modify display setting (-Xi switch) is on, then house cusps will be included in the chart. If the show glyphs on aspect lines setting (-XA switch) is on, then final dispositor objects won’t be circled. If the Indian wheel display setting (-J switch) is on, then the dispositor wheels will arrange objects clockwise instead of counterclockwise around them. If the show house details setting (-XC switch) is on, then the dispositor wheels will have the Sun or first object at the top of the wheel instead of at the left.
-7 -X: A graphical ephemeris of esoteric Ray influences is available by combining the -7 esoteric chart switch with -X. This chart is effectively the Ray power values in the -7 switch text mode chart graphed over time. The seven Rays and their powers (and average power) are listed on the horizontal axis, and time on the vertical axis. If the modify chart setting is on, this chart will graph an entire year instead of just a month. Similarly, as with the graphic ephemeris chart (-E -X switches), this chart will graph multiple years instead of just a single year, if the -EY multiple ephemeris years switch setting is active. If the -Xi alternate display mode is on, it will graph the “slice” power of each Ray instead of the “count” power. If the -Xl show glyph labels setting is on, this display will have a horizontal line drawn across the chart indicating the day and time in question, to make it easier to see where in the month or year the chart time actually is. The -YX7 switch specifies the width in influence units of each Ray’s column in the esoteric graphic ephemeris. For example, given “-YX7 600”, then a Ray influence value of 400 will fill 2/3 of the column.
-K -X: Graphic calendar charts are available by combining the -K calendar chart with -X. This is another graphics format that can be switched to whenever screen graphics are up by pressing the 'K' key. This shows a calendar for the month of the current chart, like the corresponding text chart but in graphic format with boxes for each day like a real calendar. The current day within the month will be highlighted in green (if the -Xl label inhibitor flag isn't on). The -Xi alternate display mode will put the date numbers in the middle of their box instead of in the upper left corner. Finally the -Xt chart info display flag for this particular chart will control how the date numbers are justified in their box. The -Ky yearly calendar switch may be combined with -X switch to generate a graphic calendar for the entire year. When the graphic calendar for the year is drawn, the 12 individual months will be arranged in either a 2x6 grid, a 3x4 grid, a 4x3 grid, or a 6x2 grid, based on the dimensions of the chart; for example, a square chart will be drawn three months across by four down, but a tall skinny chart will cause the calendar layout to be in a 2x6 grid.
The graphic calendar will include aspect and other events times within each day’s box, if the “show glyphs on aspect lines” setting is active (-XA switch). This effectively combines the graphic calendar with the transit to transit times search (-d switch). Depending on the amount of room available in the boxes, displayed will be the aspect event, its exact time, and markers for void of course Moon and Moon phases. Do you miss the aspect calendars in Jim Maynard’s Celestial Guide and Pocket Astrologer books, after they stopped printing them? This feature can allow you to make your own. :)
Astrolog’s graphic calendar when showing aspects within each day’s box (-XA switch) will show transit to natal aspects when in a comparison chart mode, showing aspects between the transiting date (such as set with the -t switch or in the Transits dialog) and the natal chart. For example, turn on the “Info / Comparison Chart” menu command (-r0 switch) to show it. This will do progressed to natal instead if in “Progressed to Natal” node (-rp switch). To distinguish this from standard transit to transit calendar aspects, transiting planets will be flagged with a “T” prefix, and progressed planets with a “P” prefix.
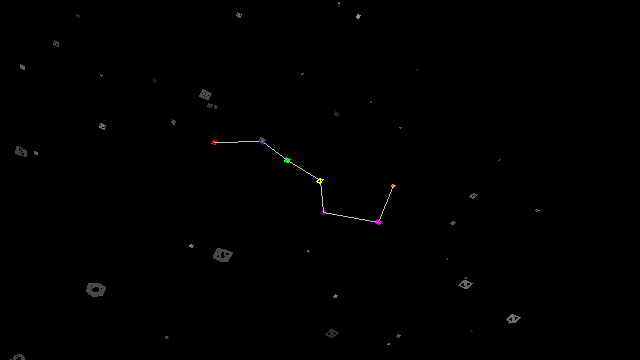
-E -X: A graphical planetary tracking chart is available by combining the -E switch with -X. This “graphical ephemeris” will display the sign degrees of the zodiac along the horizontal axis, and the days in the given month along the vertical. The positions of the planets at each day (at the time and zone from the current chart) are then graphed. The result is a bunch of wavy lines that make it easy to see all the planetary movements during the month. Wherever lines cross there’s a conjunction on the day indicated on the axis at the same level as the crossing. Altho
The dial chart will have a red arrow crossing the wheel pointing to the focus planet or degree, and it can be interactively moved by pressing the left and right arrow keys, or by clicking and dragging the right mouse button. The parameter to the -XZ switch (or the “telescope focuses on this object” field in the Graphics Settings dialog) will indicate the object for the dial to focus upon. If that field is empty and not set to a planet, then the dial will instead point to the degree indicated by the parameter to the -XW switch (or the “horizontal map degree rotation” field in Graphics Settings).
The dial will also draw lines between planets which have the focus point as their midpoint. These lines will use the orb of the Conjunction aspect to determine how wide to allow lines. The middle of the chart will list these midpoints, showing the two objects forming the midpoint, the angle in dial degrees between them, and the orb or how offset the midpoint is from exact. This midpoint list can be sorted in several different ways, based on the -a subswitch (or the “sort aspect list by” field in the Chart Settings dialog). Specifically, you can sort by aspect i.e. angle (the default), by orb, or by object index. Note that the “3D aspects” setting will apply to these midpoints, and if enabled will calculate 3D midpoints based on great circles that take ecliptic latitude into account, instead of just midpoints based on zodiac position only. If the “show equator” setting is on (-Xe switch) then instead of a dial and midpoint tree, standard aspects between points around the wheel will be drawn.
-Z -X: The -Z local horizon feature can be displayed in an X window as well (e.g. astrolog -Z -X), in which all the planets will be displayed in a window depicting the sky. The small dot above or below each glyph indicates exactly where each planet is. (Some of the glyphs may be overlapping, although the program tries to avoid this.) There is a horizontal line dividing the window representing the local horizon; planets above this line are visible, while planets below it are set. There are three vertical lines dividing the window as well: The middle line represents the due south direction, the one to the left is due east, the one to the right is due west, and the edges of the window are due north. (These directions are labeled in the borders of the chart.) Like the standard chart display, this window or graphic may be resized to any proportion. At any time one can press the 'Z' key when a graphic is up to enter this display type in that window.
-Z0 -X: An additional graphics chart is available through the -Z0 switch: local horizon charts suitable for stargazing. The normal -Z switch generates a listing of the planets with respect to the local horizon, and the -Z combined with the -X switch generates a graphic image of the planets and stars on the local horizon. That chart assumes one is facing due south, and is divided left to right by the horizon line, with straight up being toward the top of the screen and straight down toward the bottom. That is a good chart, especially for noticing the rising and setting of planets and other objects, but the fact that the meridian is split up causes distortion when trying to view objects high up in the sky. Therefore, if one combines this -Z0 switch with the -X switch, a differently oriented local horizon chart will be displayed. Here, the zenith point straight up is in the center of the screen, and the horizon line is a surrounding circle. Due north is along the line from the center to the top of the screen, due south is on the line from the center to the bottom, east is to the left, and west is to the right. In other words, this is just like what one would see if they were lying on their back looking straight up with their feet to the south, so this should be better for stargazing. Outside the circle marks what’s below the horizon, and the extreme corners of the screen mark the nadir or what’s straight down. All points below the horizon are compressed to fit between the horizon circle and the outer boundary square, allowing all points in the sky to be visible. As with the normal -Z graphic chart, this one has the various axes marked at five degree increments.
The placement of directions in this circular local horizon chart can be changed with the -YZ switch setting. If the -YZ switch setting is odd, the chart will be flipped horizontally across the East West axis (and the E/W labels will be flipped too of course). If the -YZ setting is 4 or greater, the chart will be flipped vertically across the North South axis.
-S -X: The -S switch can be combined with -X to give a graphics chart of the solar system. This will be displayed as an aerial view of the entire solar system, with 0 degrees Aries to the left of the screen, 0 degrees Cancer to the bottom, etc. Whatever object is chosen to be the central body is at the center of the screen, with all the others around it. This is a fun chart to animate, in that one can watch the planets orbit around the Sun, and see how they turn retrograde with respect to the Earth. In addition to the bodies themselves, twelve spokes are drawn from the center body to the edge of the chart, which delineate the zodiac with respect to it. This chart will also label the zodiac signs, with sign glyphs around the outside edge of the chart. These glyphs and the lines to mark the sign boundaries can be toggled with the show house details setting (-XC switch). This chart can also display aspect lines between the planets. The aspects present will be with respect to the central body, and will be the same aspects as seen in the aspect grid or in the middle of a wheel chart. The display of these aspects can be toggled with the show equator setting (-Xe switch).
Note that the scale of the solar system is large, which means attempting to fit all the planets out to Pluto on the screen at once will cause all the inner planets to be crammed together near the middle of the screen. To deal with this, the scale size as indicated with the -Xs switch and the '<' and '>' keys will affect how much of the solar system is viewed at once (in addition to controlling the glyph sizes). For a scale size of 100, the viewing region will have a wide radius of 90 AU, enough to easily include the entire solar system, as well as the orbits of the hypothetical Uranian bodies beyond Pluto. For the default scale size of 200, it will have a radius of 30 AU, enough to include Neptune (and Pluto most of the time). For a scale size of 300, the viewport will have a radius of 6 AU (about out to the orbit of Jupiter, which is useful for viewing the inner planets). Finally for a scale size of 400, the viewing region will have a radius of 1 AU (just enough to cover the Earth’s orbit). At a 400% scale zoom with the Moon included as well, one can actually get a feel for the relative distance of the Sun from the Earth and the Moon from the Earth, although the chart will have to be over 1000 pixels wide for the Moon to even appear one pixel away from the Earth! If the scale size is 400, and the -XS graphic text scale is set to 200 or larger, then the viewing region will be a very small 0.006 AU, which is just large enough to fit the Moon’s orbit, so works well with geocentric or Moon object centered charts, to see the motion of the Moon, Nodes, and Lilith around the Earth. Note that if the -b ephemeris files setting is off, then Earth’s Moon will be left out.
This chart can display star objects, as well as the list of additional stars. If stars objects are unrestricted, or the list of additional stars is being shown, then their positions will be plotted in this chart. Because stars are so far away, the chart scaling will be in light years instead of Astronomical Units (AU), which is a factor of about 63000. That will make all planets appear to be overlapping in the middle of the chart, and as a result when showing stars it’s recommended to restrict all non-star objects except the Sun. Astrolog’s 3D wireframe file of this chart will plot stars in 3D space, resulting in a 3D environment in which one can explore the local area of the galaxy. For example, the Astrolog animation http://www.astrolog.org/astrolog/screen/dipper.gif flies through space around the Big Dipper, allowing one to see how it appears from different angles.
-l -X: The Gauquelin sector chart may be displayed in graphical form by combining the -l switch with -X, where the 36 sectors will be arranged in a wheel, with chart header info displayed at the bottom or in a sidebar as with regular wheels. Each planet will be plotted at its appropriate sector location, with plus zone sectors labeled in red and minus in dark green, and aspects will be indicated in the middle of the wheel. This chart also has the plus or minus zone status of each sector indicated by a small plus or minus sign around the outside border of the wheel. The sidebar in this graphic Gauquelin sector wheel chart will to the right of each planet position show the sector number the planet falls in. (Normally this is just the glyph for the object in question like it is for the other wheels.)
-j -X: Graphic dispositor charts are available by combining the -j influence switch with -X. This is a another graphics chart format that can also be switched to whenever screen graphics are up by pressing the 'J' key. The dispositor of a planet is the planet that rules the sign it’s located in. For example, if you have Venus in Aries, the dispositor for your Venus is Mars. A graph can be made showing an arrow from each planet to its dispositor. A final dispositor is a planet who is its own dispositor, i.e. in its ruling sign with no arrows pointing away from it. There can also be two planets in what’s called mutual reception (or a reception loop of more than two) if they are each other’s dispositor, e.g. Venus in Aries and Mars in Libra. Astrolog’s dispositor chart will show four subgraphs, one in each quadrant. Both a sign dispositor graph, as described above, and a house dispositor graph, where each planet is linked to the planet ruling the house it’s in, are shown. In addition, both types have the same information displayed in two different useful formats: a wheel with the planets around the perimeter, and in a hierarchy with final dispositors at the top and the other planets stacked based on how many levels they are from final ones. Final dispositors are circled in white, while those in reception loops are circled in gray, and dispositor arrows within the top level (i.e. in reception loops) are in white too instead of the color of the planet for easy identification. For a demo of the dispositors in your own chart, do “astrolog -i yourchartfile -j -X”.
This chart normally graphs standard rulership dispositors, and will include all non-star and non-cusp objects within it. However, if standard rulerships are restricted (-YR7 switch) and esoteric rulerships aren’t, then it will instead graph esoteric rulerships. If esoteric rulerships are graphed, then the chart will always include Earth and Vulcan (which means Vulcan should be unrestricted so its position isn’t 0Aries) for 12 planets instead of 10 in the chart. If both standard and esoteric rulerships are restricted and Hierarchical rulerships aren’t, then this will instead graph Hierarchical rulerships.
If the modify display setting (-Xi switch) is on, then house cusps will be included in the chart. If the show glyphs on aspect lines setting (-XA switch) is on, then final dispositor objects won’t be circled. If the Indian wheel display setting (-J switch) is on, then the dispositor wheels will arrange objects clockwise instead of counterclockwise around them. If the show house details setting (-XC switch) is on, then the dispositor wheels will have the Sun or first object at the top of the wheel instead of at the left.
-7 -X: A graphical ephemeris of esoteric Ray influences is available by combining the -7 esoteric chart switch with -X. This chart is effectively the Ray power values in the -7 switch text mode chart graphed over time. The seven Rays and their powers (and average power) are listed on the horizontal axis, and time on the vertical axis. If the modify chart setting is on, this chart will graph an entire year instead of just a month. Similarly, as with the graphic ephemeris chart (-E -X switches), this chart will graph multiple years instead of just a single year, if the -EY multiple ephemeris years switch setting is active. If the -Xi alternate display mode is on, it will graph the “slice” power of each Ray instead of the “count” power. If the -Xl show glyph labels setting is on, this display will have a horizontal line drawn across the chart indicating the day and time in question, to make it easier to see where in the month or year the chart time actually is. The -YX7
-K -X: Graphic calendar charts are available by combining the -K calendar chart with -X. This is another graphics format that can be switched to whenever screen graphics are up by pressing the 'K' key. This shows a calendar for the month of the current chart, like the corresponding text chart but in graphic format with boxes for each day like a real calendar. The current day within the month will be highlighted in green (if the -Xl label inhibitor flag isn't on). The -Xi alternate display mode will put the date numbers in the middle of their box instead of in the upper left corner. Finally the -Xt chart info display flag for this particular chart will control how the date numbers are justified in their box. The -Ky yearly calendar switch may be combined with -X switch to generate a graphic calendar for the entire year. When the graphic calendar for the year is drawn, the 12 individual months will be arranged in either a 2x6 grid, a 3x4 grid, a 4x3 grid, or a 6x2 grid, based on the dimensions of the chart; for example, a square chart will be drawn three months across by four down, but a tall skinny chart will cause the calendar layout to be in a 2x6 grid.
The graphic calendar will include aspect and other events times within each day’s box, if the “show glyphs on aspect lines” setting is active (-XA switch). This effectively combines the graphic calendar with the transit to transit times search (-d switch). Depending on the amount of room available in the boxes, displayed will be the aspect event, its exact time, and markers for void of course Moon and Moon phases. Do you miss the aspect calendars in Jim Maynard’s Celestial Guide and Pocket Astrologer books, after they stopped printing them? This feature can allow you to make your own. :)
Astrolog’s graphic calendar when showing aspects within each day’s box (-XA switch) will show transit to natal aspects when in a comparison chart mode, showing aspects between the transiting date (such as set with the -t switch or in the Transits dialog) and the natal chart. For example, turn on the “Info / Comparison Chart” menu command (-r0 switch) to show it. This will do progressed to natal instead if in “Progressed to Natal” node (-rp switch). To distinguish this from standard transit to transit calendar aspects, transiting planets will be flagged with a “T” prefix, and progressed planets with a “P” prefix.
-E -X: A graphical planetary tracking chart is available by combining the -E switch with -X. This “graphical ephemeris” will display the sign degrees of the zodiac along the horizontal axis, and the days in the given month along the vertical. The positions of the planets at each day (at the time and zone from the current chart) are then graphed. The result is a bunch of wavy lines that make it easy to see all the planetary movements during the month. Wherever lines cross there’s a conjunction on the day indicated on the axis at the same level as the crossing. Altho